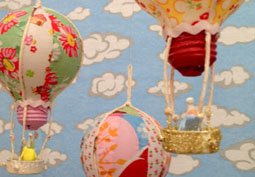
Rook No. 17 has an adorable crafting project tutorial for re-purposing old, burned out light bulbs. Make your own party decorations, baby room decorations or whimsical gifts for friends and loved ones. Re-use something old by turning it into something fun and new!
Materials
- Fabric or scrapbook paper scraps
- Burned out light bulb of any size
- Craft bond all-purpose glue
- Scissors
- String, yarn or twine
- Acrylic paint
- Wide-mouthed bottle or a narrow glass (for drying rack)
- Ribbon scraps
- Plastic water bottle cap
- Awl or bamboo skewer
- Glitter
- Small plastic animal
- Permanent marker (optional)
Method
- Mix 1 tablespoon of all-purpose glue with 1 teaspoon of water in a small bowl.
- Measure the light bulb from the top-center, down to the metal base. Cut 4 petal-shaped pieces of fabric or paper to that length. Cut 4 more petal-shaped pieces in a second fabric or paper.
- Using a small paintbrush, brush the thinned glue onto a small area of the light bulb and set the first petal in place. Brush the paper gently with a layer of glue. Repeat with other 3 petals in the first color. (Place and glue the lighter color first).
- Repeat this process with the darker petals.
- Once all 8 petals have been glued, gently set the bulb into a wide-mouthed bottle to dry for at least 30 minutes. Turn lightbulb upside-down to dry another 30 minutes.
- While the bulb is drying, use a sharp pointed tool to poke 4 holes, evenly spaced, around the bottle cap.
- Widen the holes, if necessary, by running a bamboo skewer through each hole.
- Add the acrylic paint color of your choice to the bottle cap. Paint the outside first. once it’s dry, paint the inside. Allow the cap to dry completely.
- Apply a thin layer of glue to the outside of the cap, add glitter. Once the outside is dry, repeat the process to the inside of the bottle cap.
- Tie a loop in a pieces of string.
- While holding the loop in place at the top of the bulb, brush non-diluted glue onto the string from the top of the bulb, to the metal base of the light bulb.
- Tie another piece of string around the top knot, gluing to the bulb from the top to the base of the light bulb.
- Dry bulbs upside-down.
- While the glue is drying, paint the metal base of the light bulb in the acrylic color of your choice. Allow time for it to dry completely.
-
Rub some glue on the tip of each piece of string. Twist ends to make them easier to pass through the bottle cap holes. Allow them to dry.
- Thread one end of stiff string through each of the four holes in the bottle cap. Tie a knot at the end. (Trim excess string.)
- Glue a small plastic or clay animal into the basket (or an object of your choice).
- Hang the balloon with elastic string to brighten up any room!
- Add a quote or sign your name using a permanent marker.
For a step-by-step photo tutorial, visit Rook No. 17.


