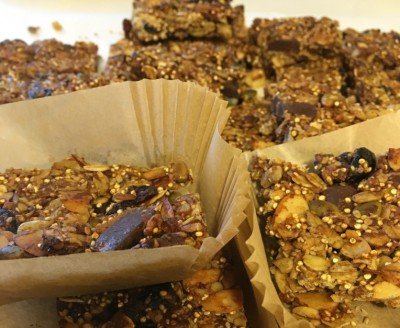
MilSpouse mama, Laurie Borrett, is always on the go, running from one activity to another. That’s something we can all probably relate to, especially Military Families that may be facing even more challenges that others. So what’s a gal (or guy!) to do when time is short and healthy snacks aren’t within reach? Laurie whips up classic granola bars ahead of time to have on hand! We think that’s a great idea to help you stay healthy on the run. Luckily, she shared the recipe with us!
Classic Granola Bars
Prep Time: 15 minutes
Cook Time: 25-30 minutes
Cool Time: 3 hours minimum
Yields: 14-20 bars
Ingredients:
Dry Ingredients
• 2 cups, Old Fashioned Oats
• 1/2 cup, Quinoa (uncooked)
• 1 cup, sliced almonds
• 1/4 cup chia seeds
• 1/2 cup hemp hearts
• 1/2 cup, pepitas (pumpkin seeds)
• 1/2 cup, sunflower seeds
• 1/2 cup, raisins or dried cranberries
• 1/2 cup, dried blueberries or cherries
• 1 TSP , Cinnamon
• a pinch of sea salt
• (optional) 1 cup, chocolate chunks or chips (I used Enjoy Life brand: soy & dairy free)
Wet Ingredients
• 1 TSP, Vanilla Extract
• 1 (large) Banana
• 1/4 cup, Honey
• 1/2-1 cup of dates/ or a mix of dates, raisins, and dried berries
• 1/4 cup almond butter (or other nut butter)
• 2 TBS, coconut oil (melted)
Instructions:
1. Preheat the oven to 350 degrees F.
2. Line a large rectangular pan or cookie sheet with parchment paper. I used a large stone baking sheet.
3. In a very large bowl measure and mix together all of the dry ingredients.
4. In a high-powered blender or food processor add in all of the wet ingredients. Mix until well blended and smooth.
5. Pour the wet mixture over the dry ingredients. Mixing everything together really well so that the dry ingredients are thoroughly coated. (*see notes)
6. Spoon the granola into the prepared pan. Firmly pressing the mixture with the back of a spatula, and evenly smoothing. You really want the granola pressed down into the pan as much as possible.
7. Bake for 25-30 mins. (I baked for 28 mins). The granola should be firm and lightly golden brown along the edges.
8. Place the pan on a cooling rack. Let cool for several hours or even overnight. You want the granola to really set before cutting.
9. Once cooled slice into bars.
Notes
*After adding the wet ingredients into the dry, if the granola mixture still seems to be a little dry add in an extra squirt or 2 of honey. Another option to help avoid this from happening in the first place: when melting the coconut oil go ahead and melt your honey with the oil. The honey will liquefy, thus better coating the granola.
So many options for the dry ingredients! Look in your pantry and substitute whatever nuts or dried fruit you have on hand. Coconut flakes, chopped dates or figs, flax or sesame seeds, puffed millet or rice would be excellent in these bars too.
Can store in a container in a cool dry place, the fridge or freezer.
To see Laurie’s step-by-step photos, go to thepaisleyolive.com/classic-granola-bars.
About Laurie Borrett:
Laurie is an ACE certified health coach, yoga instructor, avid runner, recipe creator, travel fanatic, and lover of all things fitness. She and her family currently lives in Okinawa, Japan. A Marine Corps wife and busy mama to daughter Olive Kate, when Laurie is not teaching yoga or blogging, you can find her running along the East China Sea, buying fresh local produce from Okinawan markets, exploring the local cafes, developing recipes, and just loving every second of being a mama.


